
If you’re tired of hearing about my kitchens, skip the first two paragraphs!
I just delivered another kitchen, and not soon enough for me. This one was a cute little boy theme, but it took me a really long time to finish. I’ve been traveling so much, and had to finish the other one first.


This one started as a great piece and was really easy to make. I like the way the manly colors turned out. Thanks to Lindsay Cutler and her boys for being so patient. Next up….an awesome little girl kitchen for the grand daughter of a co-worker. I am so excited about how this one is shaping up, but I won’t share pictures until it’s done.
This weekend wasn’t all that productive as far as crafts go, because we left town to soak with boys in Glenwood Hot Springs. But when we came home, I decided that we had time for one small project.: Our Easter Piñata.
I had this idea several weeks ago, and had a vague recollection of making a piñata in Spanish class in 8th or 9th grade. We used balloons, newspaper strips, and wallpaper paste. I thought this sounded kind of messy, especially with a 2 and 3 year old. I needed to do research.
I looked online and read a very informative article about making piñatas, throughout which the author referred to the process as “paper machete”. It seems that the preferred method for making paper machete piñatas is to use newspaper and wallpaper paste. I guess our teacher knew what she was doing.
But I thought, there has to be some kind of mess-free product out there! And sure enough, at Hobby Lobby, I found a special papier mache mix that has the paper already in it, and the instructions on the package seemed simple enough.
1. Add water
2. Mix
So I bought the mix, and a week or so ago, I decided to papier mache the balloon by myself, and involve the rug rats only in decorating it. I got everything ready, and quickly discovered that the papier mache mix sucks.
The only way to get it to stick to the balloon was to apply it with a heavy hand. It looked like a bug lump by the time I was done, and after sitting in our laundry room for 4 days, still wasn’t completely dry. Apparently, the preferred paper machete method is preferred for a reason!
After we returned from our little trip, the shell seemed pretty dry. It did dry very light, but it seems brittle, and I don’t think it’s strong enough to hang up.
I cut up strips of brightly colored tissue paper, and lovingly fringed each one. We got out the Elmers glue, and the boys and I went to work. This is what I was envisioning for our Easter Pinata.
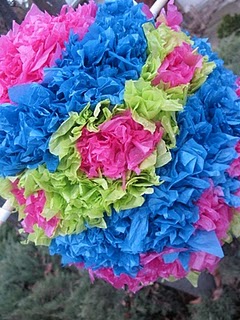

This is what it actually looks like:

The best part was letting the boys fill it with candy. They are so excited to share this piñata (“yata” if you’re Ben, “kinyata” you’re Jacob) with their friends, and thank heavens, they don’t care what it looks like.

But still…I don’t think we’re going to be able to hang it up, particularly with 3 lbs of candy in it. So what do we do? Here are some of the alternatives I’ve been mulling over:
- Pitch it to the kids and let them hit it like a baseball (but it would break when the first kid misses, which led me to the next idea)
- Put it on a tee and let them swing at it like in t-ball.
- Lay it on the ground and let them stomp it open
- Throw it up in the air and let it crack open on the ground
- Let them take turns throwing it to each other “hot potato” style until someone drops it. (But since none of them can catch, this is basically the same as #4).
I am taking suggestions! Happy Easter!
The best is when Jacob corrects Ben... "It's not a yata Ben, it's a KINYATA."
ReplyDeleteWhat about letting them hit it with a golf club? They can crack it open AND work on their swing! -Gina
ReplyDelete